
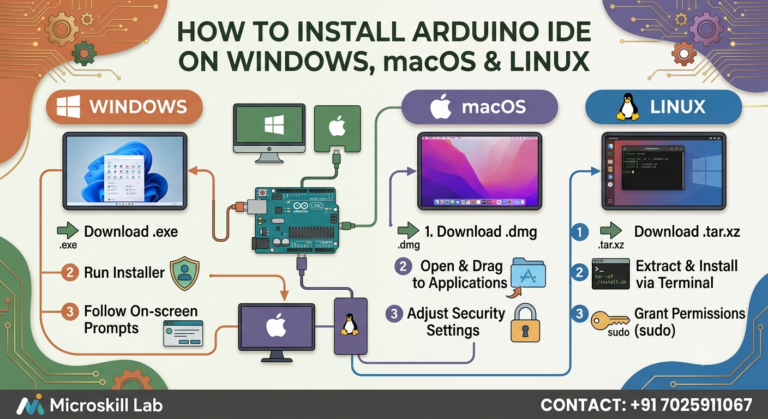
The Arduino IDE is the free programming software used to write, compile, and upload code to Arduino boards, and installing it correctly is the first practical step for any beginner in Bangalore or anywhere in India who wants to build electronics and embedded systems projects. This guide walks you through installation on Windows, macOS, and Linux, plus Board Manager setup, USB drivers, and common fixes—no prior coding experience required.
⚡ Key Takeaways
- Learn the exact installation steps for Windows, macOS, and Linux in one guide, avoiding the trial-and-error most beginners experience.
- Configure USB drivers and the Board Manager correctly, where most Arduino Uno installation problems actually occur.
- Understand whether Arduino IDE 1.8.x or Arduino IDE 2.x is the better choice for beginners.
- Fix common “Port not detected” and “Board not found” errors confidently.
- See how Arduino IDE skills connect directly to embedded systems and IoT career opportunities in Bangalore.
- Learn the next steps after installation to become an embedded systems professional.
What Is Arduino IDE?
A Beginner-Friendly Definition
The Arduino Integrated Development Environment (IDE) is a free, open-source application used to write Arduino sketches, compile them into machine code, and upload them to Arduino boards such as the Arduino Uno.
Instead of installing separate editors, compilers, and upload utilities, Arduino IDE combines everything into one easy-to-use application. This simplicity allows beginners to start building hardware projects within minutes.
Who Should Learn Arduino IDE
This guide is ideal for:
- Engineering students beginning embedded systems.
- Electronics hobbyists building automation or robotics projects.
- Working professionals transitioning into embedded systems or IoT.
- Students preparing for laboratory sessions at engineering colleges.
If you’re preparing for our Arduino Programming and Projects Course, having Arduino IDE correctly installed before your first session saves valuable classroom time.
System Requirements Before Installing Arduino IDE
Minimum Hardware and Operating System Requirements
Before downloading Arduino IDE, ensure your computer meets these basic requirements.
- Windows: Windows 10 or later (64-bit).
- macOS: macOS 10.15 (Catalina) or newer.
- Linux: Ubuntu 20.04+, Debian, Fedora, Raspberry Pi OS, or similar distributions.
- Minimum 500 MB of free storage.
- One available USB-A or USB-C port.
- Stable internet connection for the initial installation.
Pre-Installation Checklist
Before beginning the installation, prepare the following.
- Arduino Uno (or compatible board).
- USB data cable (not charging-only).
- Administrator or root access for driver installation.
- 15–20 minutes of uninterrupted setup time.
Students enrolled in our Embedded Systems Professional Programme complete this checklist before every practical session, significantly reducing setup delays.
Installing Arduino IDE on Windows
Download and Install
Download the Windows Installer (.exe) from the official Arduino website rather than using the Microsoft Store version. The standalone installer provides greater control over USB driver installation.
- Download the latest Arduino IDE installer.
- Run the installer as Administrator.
- Accept the license agreement.
- Leave all default components selected.
- Allow installation of USB drivers when prompted.
- Complete the installation.
Verify Driver Installation
After launching Arduino IDE for the first time:
- Connect your Arduino Uno using a USB cable.
- Open Device Manager.
- Expand Ports (COM & LPT).
- Verify that your Arduino Uno appears with an assigned COM port.
If no COM port appears, reconnect the USB cable or try another USB port before reinstalling drivers.
This same installation workflow forms the first lab exercise in our Arduino Programming and Projects Course.
Installing Arduino IDE on macOS and Linux
macOS Installation
Download the macOS package (.zip or .dmg), then:
- Extract or mount the download.
- Drag Arduino IDE into the Applications folder.
- Launch Arduino IDE.
- If macOS blocks the application, open System Settings → Privacy & Security and choose Open Anyway.
Most modern Arduino Uno boards require no additional USB drivers on recent macOS versions.
Linux Installation
Linux users can install Arduino IDE using either the AppImage or compressed package.
Typical installation steps include:
- Download the appropriate Linux package.
- Extract or make the AppImage executable.
- Run the installation.
- Add your account to the
dialoutgroup using:
sudo usermod -a -G dialout $USER
Log out and log back in before using Arduino IDE.
Distribution-specific notes:
- Ubuntu and Debian generally require only the
dialoutgroup change. - Fedora may use the
uucpgroup instead. - Raspberry Pi OS usually works without additional configuration.
Board Manager, Drivers and Library Installation
Configure Board Manager
Open:
Tools → Board → Boards Manager
Install the package:
Arduino AVR Boards
Then select:
- Arduino Uno
- Correct serial port under Tools → Port
Selecting the wrong board or COM port remains the most common beginner mistake.
Installing Libraries
Arduino libraries simplify communication with sensors, displays, motors, and communication modules.
Open:
Sketch → Include Library → Manage Libraries
Popular beginner libraries include:
- Servo
- DHT Sensor Library
- LiquidCrystal
- Wire
- WiFi
| Setup Component | Priority | Typical Time |
|---|---|---|
| Arduino IDE installation | Essential | 10–15 minutes |
| USB driver verification | Essential | 5–10 minutes |
| Arduino AVR Boards installation | Essential | 5 minutes |
| Installing common libraries | Project dependent | 2–5 minutes each |
| IDE auto-complete configuration | Optional | Immediate |
Move beyond installation and start building real Arduino projects. Our Bangalore-based trainers guide you from IDE setup through sensor interfacing, programming, and embedded systems projects using professional lab equipment. Enrol in the Arduino Programming and Projects Course →
Troubleshooting Common Installation Problems
Arduino Board Not Detected
If your Arduino Uno does not appear under Tools → Port, check the following:
- Verify that your USB cable supports data transfer.
- Reconnect the board using another USB port.
- Reinstall USB drivers.
- Confirm the correct board is selected.
- Restart Arduino IDE.
IDE Does Not Start
If Arduino IDE refuses to launch:
- Verify your operating system meets the minimum requirements.
- Download a fresh installer.
- Remove previous installations completely.
- Temporarily disable antivirus software if it blocks installation.
- Try Arduino IDE 1.8.19 if older hardware struggles with IDE 2.x.
Common Problems and Solutions
| Problem | Likely Cause | Solution |
|---|---|---|
| Board not detected | Charge-only USB cable | Use a data-capable USB cable |
| No COM port | Driver missing | Install USB driver |
| Upload failed | Wrong board or port | Select correct board and COM port |
| Installer blocked | Antivirus or firewall | Allow Arduino IDE as a trusted application |
| Permission denied (Linux) | User not in dialout group | Add user to the dialout group and log in again |
Why Arduino IDE Skills Matter for Embedded Systems Careers
Your First Embedded Engineering Skill
Installing and configuring Arduino IDE teaches the same troubleshooting process professional embedded engineers use every day.
Companies across Bangalore’s Electronic City, Whitefield, and Manyata Tech Park expect engineers to diagnose drivers, communication ports, firmware uploads, and board configuration issues independently.
Entry-level embedded systems engineers in Bangalore typically earn between ₹3.5–6 LPA, while experienced embedded and IoT engineers commonly earn ₹8–14 LPA depending on skills and project experience. These salary figures should be verified against current market conditions.
The Next Learning Steps
After Arduino IDE installation, most learners progress through the following path:
- Electronics Fundamentals
- Arduino Programming and Projects
- PIC Microcontroller Programming
- PCB Designing
- Embedded Linux Development
- Embedded Systems Professional Programme
Each course builds on the previous one, gradually moving students from simple Arduino projects to professional embedded systems development.
Ready to begin your embedded systems journey? Contact our training team to find the right course based on your experience and career goals.
Frequently Asked Questions
Is Arduino IDE completely free?
Yes. Arduino IDE is free, open-source software available for Windows, macOS, and Linux.
Do I need separate USB drivers?
Windows may install drivers automatically, but some Arduino clone boards require CH340 or FTDI drivers. Most recent macOS and Linux systems recognise genuine Arduino Uno boards without additional drivers.
Should beginners install Arduino IDE 1.8.x or 2.x?
Arduino IDE 2.x is recommended for most beginners because it offers improved editing features, faster board detection, and better overall usability. IDE 1.8.x remains a good option for older computers.
What should I do if Arduino Uno is not detected?
Check your USB cable, verify the correct board and port settings, reinstall drivers if necessary, and reconnect the board before restarting the IDE.
Can I learn Arduino programming without an engineering background?
Yes. Our Arduino Programming and Projects Course is specifically designed for complete beginners, including students, hobbyists, and working professionals with no previous coding or electronics experience.