
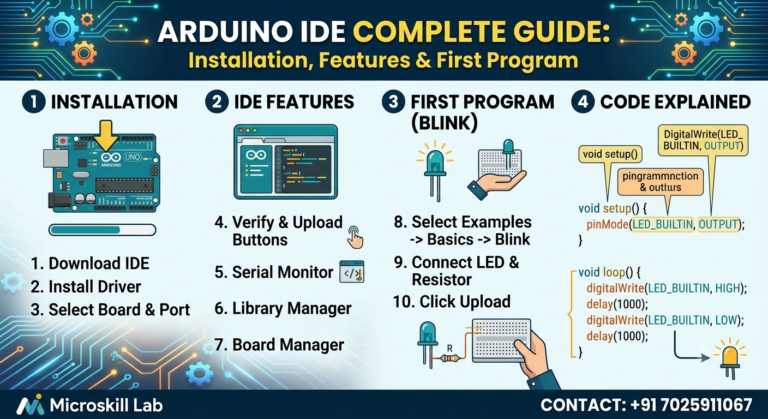
The Arduino IDE is the free software you use to write, compile, and upload code to an Arduino Uno or any other Arduino board, and it is the first tool every embedded systems beginner in Bangalore needs to install. Whether you are an engineering student, a hobbyist, or someone exploring a career switch into embedded systems, learning the Arduino IDE opens the door to hands-on hardware programming. This guide walks you through downloading the software, understanding its interface, writing your first sketch, and troubleshooting common errors.
⚡ Key Takeaways
- Download and install Arduino IDE correctly on Windows, Mac, or Linux in under 10 minutes.
- Understand every part of the Arduino IDE interface, from the Sketchbook to the Serial Monitor.
- Write, verify, and upload your first Arduino sketch to an Arduino Uno board.
- Learn how libraries extend Arduino IDE’s functionality for sensors and modules.
- Debug common upload and compilation errors like a professional embedded engineer.
- Discover how structured, mentor-led training in Bangalore accelerates your Arduino learning curve.
What is Arduino IDE?
Arduino IDE (Integrated Development Environment) is the official software platform used to write code, called a sketch, and upload it to Arduino microcontroller boards such as the Arduino Uno, Nano, and Mega. It combines a text editor, a compiler, and an uploader into a single beginner-friendly application. Anyone with basic computer skills can start writing Arduino programs within a day of installation.
The tool is built on a simplified version of C/C++, making it accessible to students who have never coded before. Bangalore’s growing electronics and IoT ecosystem, spread across hubs like Electronic City and Whitefield, relies heavily on engineers who understand this exact workflow, from writing a sketch to flashing it onto real hardware.
Who Should Learn Arduino Programming Software
Arduino programming software is used by a wide mix of learners, not just computer science graduates.
- First-year and final-year engineering students building academic projects.
- Electronics hobbyists building home automation or robotics prototypes.
- IT professionals upskilling into embedded systems and IoT roles.
- School and pre-university students preparing for robotics competitions.
- Product designers who need to validate hardware concepts quickly.
Our Arduino Programming and Projects Course is structured specifically for this mixed audience, starting from zero prior coding experience.
Arduino IDE vs Other Embedded Development Tools
Beginners often ask how Arduino IDE compares to other microcontroller development environments before committing time to learn it.
| Feature | Arduino IDE | PIC/MPLAB IDE | Embedded Linux Toolchains |
|---|---|---|---|
| Learning curve | Beginner-friendly | Moderate to steep | Steep |
| Setup time | Under 10 minutes | 30–60 minutes | Several hours |
| Best for | Prototyping, IoT, robotics | Industrial control systems | Complex connected devices |
| Cost | Free, open-source | Free with paid compiler tiers | Free, hardware-dependent |
| Community support | Very large, global | Moderate | Large but technical |
Learners who want to progress beyond Arduino into industrial-grade controllers usually move to our PIC Microcontroller Programming Programme after mastering the basics.
Why Arduino IDE Matters for Your Career in Bangalore in 2026
Bangalore’s embedded systems and IoT hiring market continues to expand, with companies across Electronic City, Whitefield, and Manyata Tech Park actively recruiting engineers who can prototype with Arduino before moving to production-grade microcontrollers. Recruiters treat Arduino IDE fluency as proof that a candidate can think practically, not just theoretically.
Salary and Demand Trends for Arduino-Skilled Engineers
Entry-level embedded systems and IoT engineers with Arduino and microcontroller programming skills in Bangalore typically earn between ₹3.5 LPA and ₹7 LPA, with candidates who add PCB design and embedded Linux skills moving toward ₹8–14 LPA within two to three years. Hiring partners across the ecosystem, including Bosch, Siemens, and TCS, look for candidates who can demonstrate a working hardware project during interviews, not just a certificate.
Industry Sectors Actively Hiring Arduino-Trained Talent
Karnataka’s IT and electronics manufacturing sector uses Arduino-based prototyping across several industries.
- Automotive electronics and sensor integration teams.
- Industrial automation and factory IoT deployments.
- Consumer electronics and smart home product companies.
- Agritech and environmental monitoring startups.
- Robotics and drone prototyping labs.
Our Embedded Systems Pro Programme is designed to take learners from Arduino basics straight into these industry-ready skill areas.
How to Download and Install Arduino IDE
Downloading Arduino IDE correctly the first time saves beginners hours of troubleshooting later. The official Arduino IDE download is available directly from Arduino and works on Windows, macOS, and Linux systems.
Step-by-Step Arduino IDE Download Process
Follow these steps to get Arduino IDE running on your computer.
- Visit the official Arduino website and select the correct version for your operating system.
- Choose Arduino IDE 2.x, the current stable release with an improved editor and auto-complete.
- Run the installer and accept the driver installation prompt on Windows for USB communication.
- Launch the application and confirm it opens to a blank sketch window.
- Connect your Arduino Uno board via USB and check that your operating system detects it.
Common Installation Errors and Fixes
Beginners in our Bangalore classroom sessions frequently hit the same three installation issues.
- Driver detection failures on Windows are usually resolved by manually installing the CH340 or FTDI driver depending on your board’s USB chip.
- Port permission errors on Linux require adding your user account to the
dialoutgroup before the IDE can access the serial port. - macOS security warnings about an unidentified developer are resolved through System Settings by allowing the Arduino app explicitly.
Exploring the Arduino IDE Interface and Features
Once installed, the Arduino IDE interface has a few key zones every beginner must recognise before writing any code. Understanding this layout prevents confusion during your first programming session.
Core Sections of the Arduino IDE Window
The interface is organised into functional zones that map directly to the coding workflow.
- The code editor sits at the centre, where you write your sketch using Arduino’s simplified C/C++ syntax.
- The toolbar contains the Verify and Upload buttons along with the board and port selector.
- The output console displays compilation progress, memory usage, and error messages.
- The Serial Monitor shows real-time data sent by your Arduino board during program execution.
Boards Manager and Library Manager Explained
Two menu-based tools extend what Arduino programming software can do beyond the default Arduino Uno.
- Boards Manager lets you install support for ESP32, ESP8266, and other compatible boards.
- Library Manager gives you access to thousands of ready-made libraries for sensors, displays, motors, and communication modules.
Get hands-on with real Arduino Uno boards from day one instead of just watching tutorials online. Our trainers guide you through every installation error and interface question in a live Bangalore classroom setting. Enrol in the Arduino Programming and Projects Course →
Writing and Uploading Your First Arduino Sketch
Your first Arduino sketch is almost always the Blink program, which turns an onboard LED on and off in a loop. This simple exercise teaches you the two required functions every Arduino sketch must contain.
Understanding setup() and loop() Functions
Every Arduino sketch is built around two functions that the compiler expects by name.
setup()runs once when the board powers on or resets and is used for initial configuration.loop()runs continuously afterward and contains your main program logic.
Verifying and Uploading Code to Arduino Uno
Once your sketch is written, follow this workflow.
- Click Verify to compile the code and check for syntax errors.
- Select the correct board and COM port from the Tools menu.
- Click Upload to compile and transfer the program to the Arduino Uno.
- Watch the TX and RX LEDs blink while the code uploads successfully.
Debugging, Serial Monitor and Libraries in Arduino IDE
Debugging is where most self-taught learners get stuck, and it is exactly where structured, mentor-led training makes the biggest difference. Arduino IDE provides three main debugging tools: compiler messages, the Serial Monitor, and library documentation.
Using the Serial Monitor for Debugging
The Serial Monitor lets your Arduino board send text messages back to your computer while your program runs.
Adding Serial.begin(9600) inside setup() and Serial.println() inside loop() allows you to print sensor values, variable states, and debugging messages in real time.
Working with Arduino Libraries Effectively
- Install libraries only through the Library Manager instead of downloading random files.
- Study the example sketches before writing your own code.
- Read the documentation to understand wiring and pin requirements.
- Update libraries periodically to maintain compatibility with newer IDE versions.
- Remove unused libraries to keep compile times short.
Learners who want to combine Arduino sensor logic with custom circuit design typically continue into our PCB Designing Programme to build production-ready hardware around their prototypes.
How to Choose the Right Arduino Training Institute in Bangalore
Bangalore has no shortage of coding bootcamps, but Arduino and embedded systems training requires physical lab access, real hardware, and instructors who have worked on production embedded projects, not just tutorial videos.
What to Look for Before Enrolling
| Criteria | Why It Matters |
|---|---|
| Hands-on lab access | Arduino skills only develop through real hardware practice. |
| Trainer industry experience | Debugging real hardware requires practical knowledge. |
| Live project component | Employers expect demonstrable projects during interviews. |
| Placement support | Structured guidance shortens your job search. |
| Curriculum beyond basics | Should include sensors, communication protocols, and PCB design. |
Foundational electronics knowledge also strengthens Arduino programming outcomes significantly, which is why many learners start with our Electronics Fundamentals Programme before moving into Arduino-specific coursework.
Building a Long-Term Embedded Systems Career Path
Arduino IDE is typically the starting point, not the destination, for a serious embedded systems career in Bangalore.
A structured learning path usually progresses through:
- Electronics Fundamentals
- Arduino Programming & Projects
- PIC Microcontroller Programming
- PCB Designing
- Embedded Linux Development
- Embedded Systems Pro Programme
Our trainers map this progression for every learner based on individual career goals, whether that is landing a placement, becoming an IoT developer, or specialising in embedded Linux.
Ready to move beyond tutorials and build real Arduino projects with expert guidance? Our Bangalore-based trainers have supported hundreds of learners from installation to their first working prototype. Talk to our team about the right course for you →
Frequently Asked Questions
Do I need prior coding experience to learn Arduino programming?
No. Arduino’s simplified C/C++ syntax and the Blink starter sketch are specifically designed for absolute beginners with zero prior programming background.
Which Arduino board should a beginner buy first?
The Arduino Uno is the standard recommendation because of its extensive documentation, community support, and compatibility with most beginner kits.
What is the difference between a sketch and a program in Arduino IDE?
A sketch is simply Arduino’s name for a program. Both refer to the same .ino source code file.
How long does it take to learn Arduino IDE basics?
Most beginners can write and upload simple sketches within their first week. Developing confidence with sensors, libraries, and debugging usually takes four to six weeks of regular hands-on practice.