
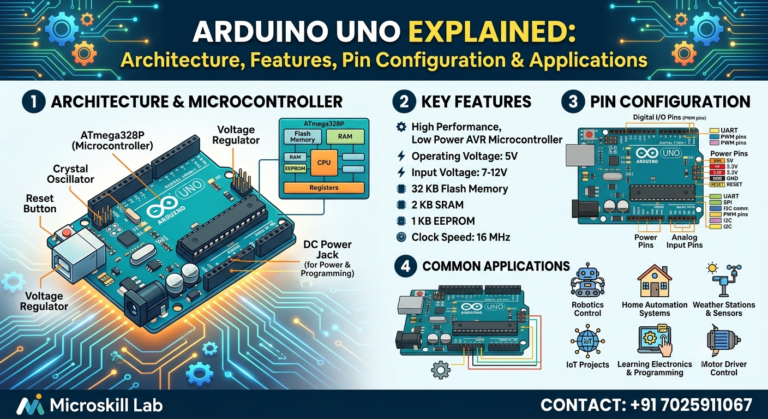
Arduino Uno is a beginner-friendly microcontroller board built around the ATmega328P chip, widely used by engineering students in Bangalore and across India to learn embedded systems, GPIO control, and sensor-based projects. It offers 14 digital pins, 6 analog inputs, and a simple USB-programmable interface using the Arduino IDE. For engineering students in Karnataka, Kerala, Tamil Nadu, and Andhra Pradesh, Arduino Uno is usually the first hands-on step into hardware programming and electronics design.
This board sits at the intersection of hobby electronics and professional embedded systems training. Once students understand its architecture and pin layout, they can move confidently into advanced microcontroller platforms used in real Bangalore product companies.
⚡ Key Takeaways
- Learn the exact role of every major component on the Arduino Uno board, from the ATmega328P to the voltage regulator.
- Understand GPIO, analog, and power pin configuration so you can wire sensors and actuators correctly the first time.
- Get a clear, step-by-step view of the Arduino IDE workflow and the C/C++-based Arduino programming language.
- See how Arduino Uno compares with ESP32 and Raspberry Pi so you can choose the right board for your project.
- Discover real embedded systems career paths open to Bangalore engineering students who master Arduino Uno.
- Find out how structured lab training accelerates your transition from Arduino projects to industry-grade embedded systems roles.
What Is Arduino Uno?
Arduino Uno is an open-source microcontroller development board designed for rapid prototyping. It uses the ATmega328P 8-bit microcontroller from Microchip and provides a straightforward way to read sensor data, control motors, and build interactive electronics projects without deep hardware design knowledge upfront.
Who Uses Arduino Uno
Engineering students, hobbyists, and early-stage embedded developers rely on Arduino Uno because it removes the complexity of raw microcontroller programming. Bangalore’s electronics colleges frequently use Arduino Uno in first-year and second-year lab courses before students move to PIC or ARM-based platforms.
We see this pattern repeatedly among students who join our Electronics Fundamentals Programme after starting with Arduino at college.
Why Arduino Uno Is the Starting Point for Embedded Systems
Arduino Uno abstracts away low-level register programming through its IDE and libraries, letting learners focus on logic and circuit behaviour first. This makes it ideal for students who are new to both C programming and electronics wiring, since a single USB cable handles power and code upload simultaneously.
Arduino Uno Architecture and Board Components
Understanding Arduino Uno’s architecture helps students troubleshoot circuits and write efficient code. The board is built around a small set of core components that work together to power, program, and run your project.
Core Hardware Components
The Arduino Uno board includes the ATmega328P microcontroller, a 16 MHz crystal oscillator, an onboard voltage regulator, a USB-to-serial converter chip, and a reset button. The ATmega328P has 32 KB of flash memory for storing your programme, 2 KB of SRAM for runtime variables, and 1 KB of EEPROM for persistent data storage.
- ATmega328P microcontroller — the processing core that executes your compiled code.
- 16 MHz oscillator — provides the timing clock for instruction execution.
- Voltage regulator — converts input voltage (7–12V) down to a stable 5V.
- USB-to-serial chip — enables programme upload and serial communication with a computer.
- ICSP header — allows direct chip programming without the bootloader.
Memory and Processing Limitations
Because Arduino Uno runs at 16 MHz with only 2 KB of SRAM, it is not suited for processing-heavy tasks like image recognition or multitasking operating systems.
Students working on such projects typically graduate to boards covered in our Embedded Systems Pro Programme, which introduces ARM Cortex-based microcontrollers with far greater compute headroom.
Arduino Uno Pin Configuration Explained
Correct pin configuration is the single biggest source of errors for beginners. Arduino Uno organises its 28 pins into three functional categories: digital I/O, analog input, and power.
Digital and Analog GPIO Pins
Arduino Uno has 14 digital pins (numbered 0–13), of which 6 support PWM output for tasks like dimming an LED or controlling motor speed. It also has 6 analog input pins (A0–A5) that read voltage values between 0 and 5V and convert them into a 10-bit digital value (0–1023) using the onboard ADC.
- Digital pins 0 and 1 are reserved for serial communication (RX/TX) and should be avoided for general GPIO use during USB programming.
- PWM-capable pins are marked with a tilde (~) symbol on the board silkscreen: pins 3, 5, 6, 9, 10, and 11.
- Analog pins can also function as digital I/O pins (A0–A5 map to digital pins 14–19) when extra GPIO is needed.
Power Pins and Voltage Requirements
The board provides 5V and 3.3V output pins, a VIN pin for external power input, and multiple GND pins for completing circuits.
Most sensors used in Bangalore college labs, including PIR motion sensors and ultrasonic modules, run comfortably on the 5V rail, while low-power Wi-Fi modules often require the 3.3V pin instead.
Arduino Uno Programming: IDE, Language, and Getting Started
Arduino Uno programming uses a simplified version of C/C++, written and uploaded through the Arduino IDE, which handles compilation and communication with the board automatically.
The Arduino Programming Language and IDE Workflow
Every Arduino sketch follows a two-function structure: setup(), which runs once at power-on, and loop(), which repeats continuously. The Arduino IDE compiles this C/C++ code into machine instructions and uploads it to the ATmega328P over USB, without requiring students to manage separate compilers or programmers.
Writing Your First Sketch
A typical first project blinks an LED connected to a digital pin, teaching pin mode configuration, digital write operations, and timing delays.
Our lab sessions at Microskill Lab build on this foundation quickly, moving students from blink sketches to sensor-driven projects within the first two weeks of the Arduino Programming Course.
Get hands-on with real hardware, not just theory. Our trainers guide Bangalore engineering students from your first blink sketch to complete sensor-based embedded projects using industry-standard lab equipment. Enrol in our Arduino Programme →
Key Features and Technical Specifications
Arduino Uno’s specifications explain both its strengths and its limits for engineering projects.
Technical Specification Summary
The board operates at 5V logic level with an input voltage range of 7–12V (recommended) through its barrel jack or VIN pin. It draws roughly 50 mA per active pin, with a maximum combined current draw that engineering students must respect to avoid damaging the board during sensor and motor interfacing.
Communication Protocols Supported
Arduino Uno supports UART (serial), I2C, and SPI communication protocols, allowing it to interface with a wide range of sensors, displays, and modules used in Bangalore-based student and industry projects.
This flexibility is why the board remains a staple in Karnataka’s engineering college electronics labs even as newer platforms emerge.
Arduino Uno vs Other Popular Boards
| Feature | Arduino Uno | ESP32 | Raspberry Pi |
|---|---|---|---|
| Processor type | 8-bit AVR | 32-bit dual-core | 64-bit ARM (Linux OS) |
| Clock speed | 16 MHz | Up to 240 MHz | 1.5 GHz+ |
| Built-in Wi-Fi/Bluetooth | No | Yes | Yes |
| RAM | 2 KB | 520 KB | 1–8 GB |
| Best for | Learning GPIO, sensors, basic automation | IoT and wireless projects | Full computing tasks, AI/ML at the edge |
| Typical student use case | First embedded systems project | Connected device prototypes | Standalone computing projects |
Real-World Applications and Projects Using Arduino Uno
Arduino Uno powers a wide range of student and prototype-level projects across automation, robotics, and monitoring systems.
Common Student and Hobby Projects
Popular Arduino Uno projects include home automation systems, obstacle-avoiding robots, weather monitoring stations, and smart irrigation controllers. Each of these projects reinforces core embedded systems skills such as sensor interfacing, actuator control, and basic data logging that translate directly into industry-relevant competencies.
Industry-Adjacent Prototyping Use Cases
Bangalore hardware startups and R&D teams often use Arduino Uno for rapid proof-of-concept builds before moving to custom PCB designs for production.
Students who understand this transition path, from Arduino breadboard prototype to a manufactured PCB, gain a real advantage when they later study our PCB Designing Programme, where they learn to convert Arduino-based prototypes into production-ready circuit boards.
Why Learn Arduino Uno in Bangalore: Career Scope and Training Path
Bangalore’s electronics and IT hardware ecosystem, spanning Electronic City, Whitefield, and Manyata Tech Park, offers strong entry points for students who build a solid Arduino and embedded systems foundation.
Career Roles After Arduino and Embedded Systems Training
Students who complete structured Arduino and embedded systems training can pursue roles such as embedded software engineer, IoT developer, hardware test engineer, and robotics technician.
Entry-level embedded systems roles in Bangalore typically pay between ₹3.5–7 LPA, while experienced embedded engineers with 3–5 years of experience working with companies like Bosch, Siemens, and TCS earn ₹8–16 LPA depending on specialisation. These salary figures should be verified against current market data before publication.
- Embedded Software Engineer — writes firmware for microcontroller-based products.
- IoT Developer — builds connected devices using boards like ESP32 alongside Arduino prototyping.
- Hardware Test Engineer — validates circuit boards and embedded modules before production.
- Robotics Technician — assembles and programmes automation and robotic systems.
- PCB Design Associate — converts prototype circuits into manufacturable boards.
Choosing the Right Training Path After Arduino Uno
After mastering Arduino Uno, students typically progress to PIC or ARM-based microcontroller programming, embedded Linux, or PCB design, depending on their career interest.
Our trainers help Bangalore engineering students map this progression clearly, starting with the PIC Microcontroller Programming Programme for students aiming at core embedded firmware roles.
If you are ready to build your embedded systems career on a strong foundation, talk to our course advisors about the right learning path for you.
Frequently Asked Questions
Is Arduino Uno good for beginners in embedded systems?
Yes. Its simplified IDE, extensive community libraries, and low cost make it the most common starting board for engineering students learning GPIO control and sensor interfacing.
What programming language does Arduino Uno use?
Arduino Uno uses a simplified version of C/C++, structured around setup() and loop() functions within the Arduino IDE.
Can Arduino Uno connect to the internet directly?
No. Arduino Uno has no built-in Wi-Fi or Bluetooth. Students needing wireless connectivity typically pair it with an ESP8266/ESP32 module or move directly to an ESP32 board.
How is Arduino Uno different from Raspberry Pi?
Arduino Uno is a microcontroller board suited for real-time, single-task hardware control, while Raspberry Pi is a full single-board computer capable of running an operating system for multitasking applications.
Where can Bangalore engineering students learn Arduino Uno hands-on?
Structured lab-based programmes, like the ones offered at Microskill Lab Training Institute, give students guided, project-based Arduino training alongside a clear path into broader embedded systems careers.