
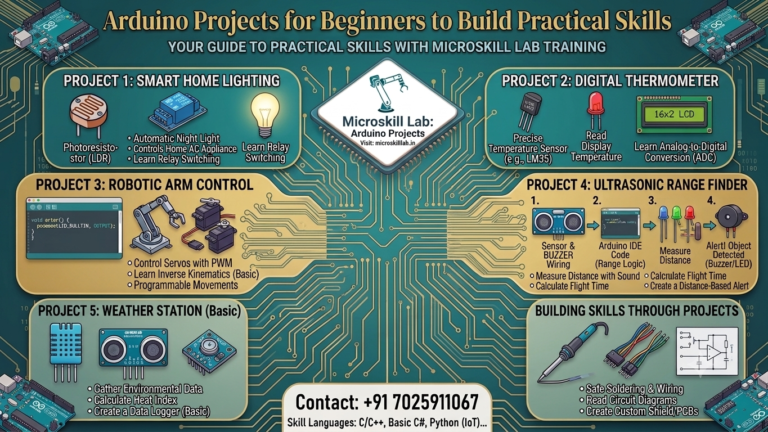
Arduino projects for beginners are the fastest way to move from watching tutorials to actually building working electronics. Whether you are an engineering student in Bangalore, a school hobbyist, or someone exploring embedded systems as a career switch, these 20 hands-on builds teach circuit design, sensor integration, and Arduino programming through direct practice rather than theory alone. Each project below uses affordable components and the free Arduino IDE, so you can start today with a basic starter kit.
⚡ Key Takeaways
- You will get a structured list of 20 beginner Arduino projects, ordered from simplest to most advanced.
- You will understand exactly which tools, boards, and components to buy before you start.
- You will learn how Arduino programming connects to real embedded systems careers in Bangalore.
- You will see where ESP32 and IoT concepts fit once you outgrow basic Arduino Uno builds.
- You will get a clear comparison of Arduino Uno versus ESP32 to guide your next purchase.
- You will know what to look for in a structured, mentor-led Arduino training programme.
What Are Arduino Projects and Why Beginners Should Start Here
Arduino projects are small electronics builds that pair a microcontroller board with sensors, LEDs, motors, or displays, controlled through simple C/C++ code written in the Arduino IDE. For a first-time learner, they are the shortest path between “I want to build something” and actually seeing a circuit respond to code.
What Makes Arduino Ideal for First-Time Learners
Arduino Uno was designed for beginners: the board is inexpensive, nearly impossible to damage permanently with wrong wiring, and supported by thousands of free code libraries. Our Arduino Programming and Projects Course uses this exact progression, starting learners with digital output before introducing analog sensors and communication protocols.
Who Should Build These Projects
These builds suit engineering students preparing for embedded systems interviews, school and college hobbyists entering robotics competitions, and working professionals in Bangalore’s IT sector exploring a shift into hardware and IoT roles. No prior coding background is required, though basic familiarity with variables and loops helps you move faster.
Why Learning Arduino Matters for Your Career in Bangalore in 2026
Bangalore remains India’s largest hub for embedded systems and electronics hardware work, with clusters of activity around Electronic City, Whitefield, and Manyata Tech Park. Arduino is where most engineers in this ecosystem first learn microcontroller logic before moving to industrial-grade platforms.
Embedded Systems Demand in Karnataka’s Electronics Industry
Karnataka’s electronics manufacturing and IT-hardware sector continues to hire embedded and IoT engineers for automotive, industrial automation, and consumer electronics projects. Companies with a strong Bangalore presence, including Bosch, Siemens, TCS, and L&T, regularly recruit for roles that begin with exactly the skills these 20 projects teach: sensor interfacing, microcontroller programming, and circuit debugging.
Salary Benchmarks for Arduino and Embedded Skills in India
Entry-level embedded systems and IoT engineers in Bangalore typically earn between ₹4–8 LPA, with candidates who can demonstrate a strong project portfolio and hands-on lab experience commanding the higher end of that range. These salary figures should be verified against current market data before publication.
Our Embedded Systems Professional Programme is structured to help students build exactly this kind of demonstrable, interview-ready portfolio.
Essential Tools and Setup Before You Start
Before jumping into the project list, gather the right hardware and confirm your software setup. This avoids the most common beginner frustration: code that is correct but hardware that isn’t wired properly.
Hardware You Need
A basic Arduino starter kit covers nearly all 20 projects below. Our Electronics Fundamentals Programme walks through each of these components in detail before students touch code.
- Arduino Uno board and USB cable.
- Breadboard and jumper wires.
- LEDs, resistors, and a buzzer.
- Push buttons and a potentiometer.
- DHT11 temperature and humidity sensor.
- PIR motion sensor and an ultrasonic distance sensor.
- 16×2 LCD display and a servo motor.
Installing Arduino IDE and Writing Your First Sketch
Download the Arduino IDE from the official Arduino website, connect your Arduino Uno over USB, and select the correct board and COM port under the Tools menu.
Your first sketch should simply blink the onboard LED. This confirms your IDE, USB drivers, and Arduino board are all configured correctly before you begin larger projects.
Top 20 Arduino Projects for Beginners
These projects are arranged from basic to more advanced so you can build confidence progressively.
Beginner-Level Projects (1–10)
- Blinking LED — Learn
digitalWrite()anddelay(). - Traffic Light Simulator — Control three LEDs using timed sequences.
- Push-Button LED Control — Learn
digitalRead()and pull-up resistors. - Potentiometer-Controlled LED Brightness — Your first analog input project.
- Buzzer Alarm Circuit — Combine input and sound output.
- Temperature and Humidity Monitor (DHT11).
- PIR Motion-Activated Light.
- Ultrasonic Distance Sensor Display using the Serial Monitor.
- 16×2 LCD “Hello World” Display.
- Servo Motor Sweep using the Servo library.
Intermediate Beginner Projects (11–20)
- Automatic Night Lamp using an LDR.
- Digital Thermometer with LCD Display.
- Obstacle-Avoiding Robot Car.
- Bluetooth-Controlled LED Panel using HC-05.
- Home Security Alarm System.
- RFID-Based Access Control System.
- Weather Station using ESP32 and DHT11.
- IoT Plant Moisture Monitor using ESP32.
- Smart Dustbin with Automatic Lid.
- Wi-Fi Controlled Home Automation Panel using ESP32.
Projects 17–20 introduce Wi-Fi and cloud connectivity, marking the transition from Arduino fundamentals into the Internet of Things (IoT).
Learn all 20 projects with expert guidance in our Bangalore training lab. Every student builds each circuit individually using real hardware and receives complete code explanations, wiring diagrams, and debugging support. Enrol in the Arduino Programming and Projects Course →
Arduino Uno vs ESP32: Which Board Should You Choose?
Once you’ve completed around 10–15 Arduino Uno projects, you will naturally begin looking for wireless connectivity. This is where ESP32 becomes the logical next step.
| Feature | Arduino Uno | ESP32 |
|---|---|---|
| Processor | 8-bit ATmega328P | 32-bit Dual-Core |
| Clock Speed | 16 MHz | Up to 240 MHz |
| Wi-Fi / Bluetooth | Not built-in | Built-in |
| Ideal For | Learning fundamentals and simple circuits | IoT projects and wireless applications |
| Beginner Friendliness | Very High | Moderate |
| Typical Price | Lower | Slightly Higher |
When to Upgrade from Arduino Uno
Move to ESP32 when your projects require:
- Wi-Fi connectivity.
- Bluetooth communication.
- Cloud dashboards.
- Remote monitoring.
- Multiple sensors with faster processing.
Students in our Embedded Systems Professional Programme typically transition to ESP32 after completing their first 8–10 Arduino projects.
Skills You’ll Develop
Completing these 20 projects builds practical engineering skills that employers recognise immediately.
Technical Skills
- Digital and analog input/output.
- Sensor calibration.
- Serial communication.
- Circuit debugging.
- Reading circuit diagrams.
- Basic wireless communication.
- Arduino programming using C/C++.
Career Roles
- Embedded Systems Engineer.
- IoT Developer.
- Firmware Engineer.
- Robotics Engineer.
- Automation Engineer.
- Hardware Design Engineer.
Students who continue into our PIC Microcontroller Programming Programme build directly on these Arduino fundamentals for industrial embedded development.
Choosing the Right Arduino Training Institute
What to Look For
- Hands-on practical sessions.
- Individual hardware kits.
- Project-based curriculum.
- Industry-experienced trainers.
- Placement support.
- Small batch sizes.
Why Students Choose Microskill Lab
Microskill Lab Training Institute provides practical, project-based Arduino training with live hardware, mentor guidance, and placement-oriented learning.
Students graduate with a portfolio of completed Arduino and IoT projects suitable for internship and placement interviews.
Ready to move beyond YouTube tutorials and build a professional embedded systems portfolio? Our Bangalore-based training centre provides live hardware labs, individual mentoring, and structured project guidance from Project 1 through Project 20. Talk to Our Admissions Team →
Self-Learning vs Structured Arduino Training
| Factor | Self-Learning | Microskill Lab Training |
|---|---|---|
| Debugging Support | Self-guided | Trainer-guided |
| Hardware Kit | Purchase separately | Provided |
| Project Documentation | Self-managed | Instructor-reviewed |
| Placement Support | None | Available |
| Learning Duration | 6–10 Weeks | 4–6 Weeks |
Frequently Asked Questions
Do I need coding experience before starting Arduino projects?
No. Arduino uses simplified C/C++, making it suitable for complete beginners.
Which Arduino board should beginners buy?
Arduino Uno remains the recommended starting board. ESP32 becomes valuable once your projects require wireless communication.
How long does it take to complete all 20 projects?
Most self-learners complete them within 6–10 weeks. Structured classroom training generally reduces this to 4–6 weeks through guided practical sessions.
Can these projects help during placement interviews?
Yes. A documented portfolio of completed Arduino and IoT projects demonstrates practical embedded systems skills that employers value.
Is Arduino still relevant in 2026?
Yes. Arduino remains one of the world’s most popular platforms for learning embedded systems fundamentals before progressing to ESP32, STM32, PIC microcontrollers, or Embedded Linux.